OPNsense
OPNsense 24.7 or newer is backed up over its API: Backuparr downloads the firewall’s current config.xml, the file that holds its whole setup (rules, interfaces, VLANs, DHCP, VPNs, users and their keys). OPNsense’s backups are always encrypted, because config.xml holds private keys and password hashes.
Setting it up
Give Backuparr a user of its own with just two privileges:
- In OPNsense, open System > Access > Users and click + to add a user (for example
backuparr). Set a long random password; nobody signs in with it. - Under Privileges, pick Diagnostics: Configuration History (the configuration download) and Lobby: Dashboard (read-only system information, for the firmware version recorded with each backup). Save.
- On that user’s row, click Create and download API key. OPNsense downloads a file with a
key=and asecret=line, shown only once. - On Backuparr’s OPNsense card, enter the URL (for example
https://192.168.1.1), the key and the secret, then Test connection.
OPNsense’s guides: Users and groups and API keys.
Neither privilege can change settings or update the firmware. OPNsense must keep a configuration history (System > Configuration > Backups, Backup Count above 0, the default): the download is its newest entry, which is the configuration in use.
The certificate
OPNsense’s web UI uses a self-signed certificate. The first Test connection says it isn’t trusted and shows it: its name and expiry, and its SHA-256 fingerprint when you point at the ? next to SHA-256 (or tap it). OPNsense prints the same fingerprint on its console (HTTPS: SHA256 ...) and under System > Trust > Certificates. If they match, click Trust, then Save. From then on Backuparr accepts only that certificate.
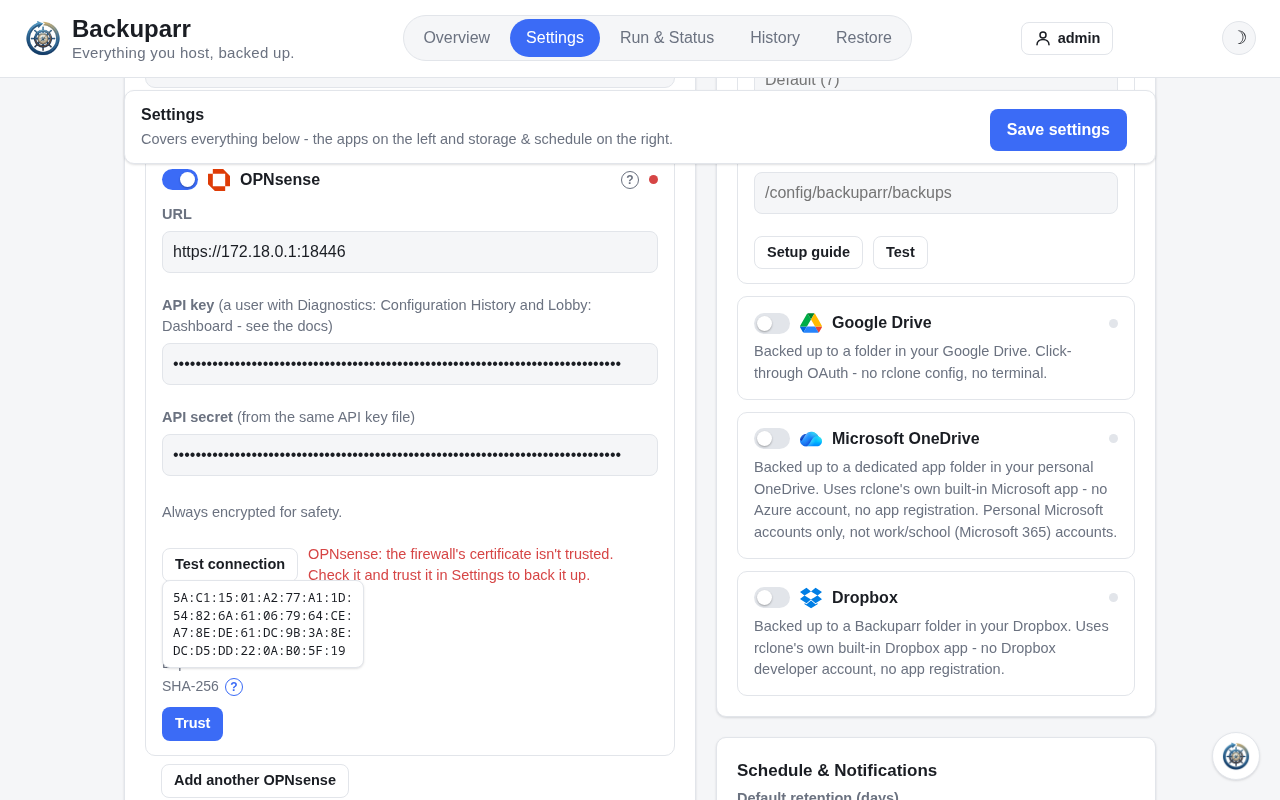
If the certificate changes (OPNsense made a new one, or you replaced it), backups stop with “The firewall’s certificate changed. Check it and trust the new one to resume backups.” Nothing is sent to the firewall until then. The failure on the Overview and in Run & Status links to the card: Test connection shows the new certificate next to the one trusted until now, and Trust (then Save) resumes backups. A certificate from a trusted CA, such as Let’s Encrypt, is checked as usual and needs no trusting.
Restoring
OPNsense’s API can only roll back to the firewall’s own history, not take a file, so a restore is done in OPNsense. Pick OPNsense and a backup on Backuparr’s Restore tab: it shows a Download button (the backup comes back decrypted, as an .xml file) and these steps.
Firewall still running (OPNsense’s guide):
- Download the backup.
- In OPNsense, open System > Configuration > Backups.
- Under Restore, leave Restore areas at All (recommended) and Reboot after a successful restore ticked. Leave Configuration file is encrypted unticked: the download is already decrypted.
- Choose the downloaded file and click Restore configuration. The firewall reboots.
- If the firewall’s interfaces have other names than in the backup, OPNsense asks you to assign them again.
New install (OPNsense’s importer):
- Download the backup and rename it
config.xml. - On a second USB stick formatted FAT or FAT32, make a folder named
confand putconfig.xmlin it (/conf/config.xml). Format it the usual way, with a partition: OPNsense reads a stick formatted without one as a CD and finds nothing. - Boot the OPNsense installer with both sticks plugged in.
- At “Press any key to start the configuration importer”, press a key and enter the second stick’s device name (for example
da1). - Log in as
installerwith the root password from the backup and install.
The download is decrypted: delete it once the firewall is back.